
In memory of those who have fought for us.

In memory of those who have fought for us.


I am trying to do at least one Quilt Design a Day on Facebook. Each day two palettes are chosen based on two photographs and then we are challenged to design at least one quilt, not spending more the 15-20 minutes on a design. Today’s photo was taken from Design Seeds, it is a picture of the side of a building: turquoise shutters with orange and blue siding. Some days I jump for joy, because the palettes are so beautiful, or the inspiration photo is so beautiful; other days I just say to my self, “huh?? how am I going to use that color scheme?” I saw today’s colors from the above photo and wondered if maybe I should go wash the dishes! 🙂
I looked at the photo, noticed the slats in the shutters and the lines of the colored siding. I tried several blocks which had similar lines, none of which seemed right to me. I went in search of inspiration and searched for photos of American Southwest art. I frequently look at art or photos to inspire me. Most of the time I will pick up a shape, an idea, or a play on words, etc. which will jump start my brain. Today, I saw a photo of a rug and thought I could adapt that to a block design and this design was born:

I was so relieved that I had come up with something, I quickly posted it…and then regretted. I liked the horizontal lines, the feeling of movement, but I wasn’t completely happy. I walked away and enjoyed a really stupid movie with my sick son. (No, his illness was not caused by looking at this quilt!) I definitely achieved a feeling of movement (maybe too much) in the quilt, when I really wanted to create more minimal design. I needed to edit. My next thought was to add some negative space, although I’m not sure that orange is that negative space and I rotated half of the blocks 90 degrees.

I think my “editing” further complicated my “minimal” design. I looked some more at the original photo. I thought that the shutters and the orange siding were important in the original photo, so the quilt should reference them. As a result I drew the slats of the shutters, I placed them off-center to the left of the block and chose the darker blue as the background, and then placed the orange. A minimal design. It is so simple, why does it seem so difficult?? Which design do you like best?

How do you get inspiration?
Have a quilty day,


I am so lucky to be able to quilt on a beautiful client quilt. My client and I decided to quilt using designs inspired by those in the fabric. I combined several medallion designs from Anita Shackelford and from Nancy Haake. The fill function in Creative Studios (the software which runs my longarm) made it easy. Here is my (very rough) design:

I learn something new from every quilt, my lessons today:
Next time I will try:
I love to try new techniques and I’m so excited to learn something new with every quilt! What have you learned today?


Have a quilty day!

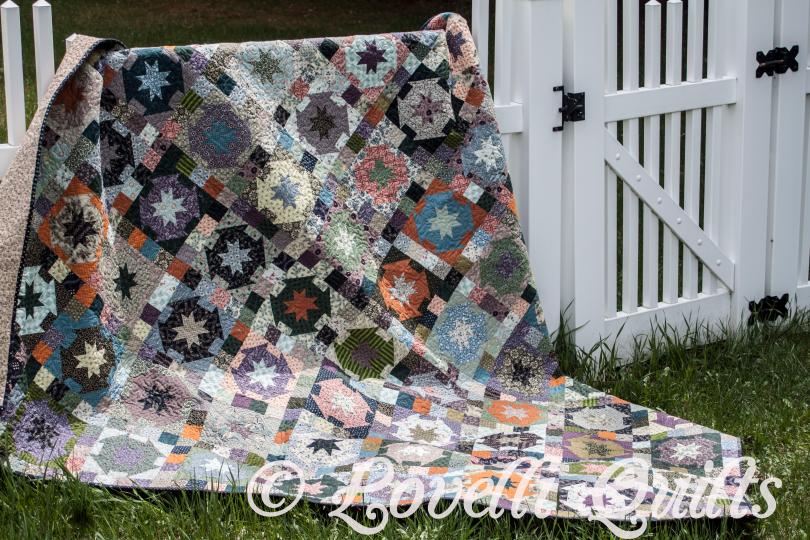
At times I felt like this quilt would never be finished–the cutting seemed to take forever and the sewing seemed to take forever. The pattern I used was taken from Kim Diehl’s book Simple Comforts. I used up a collection of assorted civil war reproduction fat quarters, unfortunately, it seems like the bins of reproduction fabrics have not reduced in number. As I mentioned in yesterday’s post, I joined in with a group of friends to make Pie in the Sky, the challenge was to make it completely with stash and I met that challenge. I used about 60 fat quarters (with some 2 1/2″ strips and squares left over). Kim’s directions were well written and clear. However, if I were to make the quilt again I would use some strip piecing methods to be more efficient, especially with the sashing. I arranged the blocks and the sashing on my design wall very carefully, and then took it off, accidentally turned some of the blocks, and sashing. Instead of ripping, I decided that that was just a ‘happy accident’ and went on. I don’t think anyone can tell and that is the beauty of Kim’s design. I quilted it with an allover floral/paisley/meander which just adds texture and lets the fabric shine.


Have a quilty weekend!!


A group of my friends decided, as a challenge, to each make a version of Kim Diehl‘s pattern, Pie in the Sky, found in her book Simple Comforts. The challenge was to make the quilt only with fabrics which were in our stash–newly purchased fabric was not allowed (of course this meant that one of our group went right out and purchased fabric, lol.) Since the quilt was in a country/civil war reproduction ‘palette’ I was afraid that it would be dark and brown, colors which I find difficult to work with. However I noticed right away that she had oranges and yellows in the quilt and that they ‘brightened’ up the quilt. How would I choose which fabrics to work with? EQ7 made it easy. I sketched the block in EasyDraw, then I set them in a quilt with the sashes and sashed border. Next it was time to choose fabrics.

At first I thought I would try a blue and cream color scheme. One of the other members of our group chose this scheme. Her quilt is beautiful and I was really tempted to follow, but in the end I wanted something a little different. I was so happy to try it out on the computer rather than deciding halfway through sewing that I wanted something different. My next experiment was to add some greens and purples to the design:

I thought this version was very, very dark in spite of the light stars. I looked again at Kim Diehl’s version–she had yellows, so I tried this:

Hmmm, not quite what I was looking for–this version looked very brown and dark to me. I needed something to ‘spice’ it up. Kim Diehl added some brights and other ‘pops’ of color. I tried some lighter and brighter fabrics: cheddars, greens, reds, and blues. I’m so happy with my results. My final design was the following:
Tomorrow I’ll show you the finished quilt, in the meantime, here is a sneak preview:


We had some absolutely stunning palettes to work from over the weekend at Quilt Design a Day. I had gobs of fun designing. The colors reminded me of summers sitting by the pool, but in the shade with sunscreen and a hat, drinking cold drinks–heaven!! I’ve been thinking about making this one. It would be fun to do with Dale Fleming’s 6-minute circle method, which you can find here: http://www.hgtv.com/video/easy-circle-quilt-blocks-video/index.html).

I’d also like to sew the Ocean Waves quilt in the patriotic colors. What a great idea for a July 4 picnic. It would be tons of fun to quilt in the negative space–fireworks, exploding feathers, etc.

Have you ever felt like the “odd bird” out? I know that I sure have, just like the red bird above. However, that is the bird that makes the quilt interesting I think. Celebrate your unique-ness today!!

Did you notice that most of my designs were inspired by things that happen in the summer??!! “Orange Cream sickle”, I loved them as a kid (if truth were to be known, I think I still like them 🙂 ). Enjoy the spring!!
Linking up with: Anything Goes Monday.
Have a quilty day!!


It is so funny that Monday’s quilt was about Peonies and today’s inspiration photo was Peonies.

I truly hope to see Peonies in the garden this year and roses.
Have a good day!!!


I feel so fortunate to have been able to take a class with Jacquie Gering of Tallgrass Prairie Studio. I took the Modern Log Cabin Makeover with two friends and each of us left the class with totally different projects. We learned several ways to piece together a log cabin block, but we also learned how to design our own unique interpretation of the log cabin. Jacquie was absolutely wonderful as a teacher: the fabric and supply lists given out prior to class were clear, complete and gave us options for fabric choices; her presentation was well-organized; she gave clear handouts (so we can continue our designs at home); she gave each student in the classroom individual attention and affirmation; she had quilts to illustrate each of the different possible log cabins; she had a great sense of humor and was willing to learn from her students. In fact, one of my friends, Pam, convinced Jacquie that ‘hot pink’ is the ‘new’ neutral. Some students walked into the classroom totally comfortable with improvisation/wonkiness and others were not. Despite these differences, Jacquie inspired each one of us to push our boundaries. I think that everyone walked out of the class feeling good about their design and feeling good about themselves.
Below are a few blocks from my project (with apologies for the photography): “Radiant Chair.”


I walked into the class with the very beginnings of an idea–purple blocks on a gray background. Thanks to Jacquie holding my fabric up I changed immediately to a purple background and started piecing “Minimalist” log cabins. I think I just needed her permission to ‘go bold’. I wanted to put slivers of yellow in and around the blocks. Jacquie loved this idea and supported my experimentation with it. She helped me feel confident about finishing the quilt at home.
I finished the piecing the blocks at a quilting day with friends at a local church I started using painter’s tape (a method from Jacquie) to put the blocks on the wall so I could see what they looked like, the pastor walked in and asked anxiously how I was affixing them to the wall. lol. (No churches were harmed in the production of these blocks). During class we learned the importance of auditioning (trying out) fabric on a design wall, walking away, analyzing and then sewing. We also learned that we needed to use math to finish the blocks so that they fit together and make a quilt. In addition, we learned her method of ‘paneling’ blocks in larger and larger groups to form the quilt top. I can hardly wait to finish sewing my top and quilt it. I’ve marked each block with painter’s tape ‘addresses’ because I’ve been working on them in various places and I don’t want to get them mixed up when I assemble the top.
Here are some of Pam’s blocks:


Pam’s blocks were originally going on a hot pink background, but, after auditioning it, Pam was underwhelmed. Next, she tried the Kaffe Fasset print and it.was.gorgeous. Pam is ready for the ‘math’ part, but I think that she is deciding how many blocks she wants in her quilt and how large she wants to make it.
And these are JoAnn’s blocks:


I love JoAnn’s use of the red and orange throughout her blocks and those big beautiful flowers. She is almost ready to piece together her top. I’m excited to see what it will look like!! I think that her blocks look like a perfect summer day, all I need now is a glass of lemonade.
Sew outside your box today,
Linking up today with Freemotion by the River, Fresh-Squeezed Fabrics, Sew Cute Tuesday, and Quilt Story


Spring might be here. After a winter of illness and travel it is wonderful to be at home and design. I’m working on a Quilt Design a Day with these wonderful designers. It is a very useful discipline and I am amazed everyday to see what everyone has done with the inspiration palette and photo.
I am linking up today with Judy L at Design Wall Monday.
Have a good day!!!

