Appraisals–Continuing Education

Appraising art quilts can be very challenging because the techniques and the materials used in them are constantly changing and evolving.  One of the ways that I keep current is to take classes from successful art quilters.  I was privileged to take a class from Norma Riehm on fabric layering techniques.  She provided us with kits in several different color ways which included everything but our sewing machines.  Each quilt was beautiful and despite having the same things in each kit, each of the quilts made during the class looked different.

img_2071

This was the first time I worked with Angelina fibers, roving, yarn, silk flowers, beads, and crystals–all together in one piece.    Norma discussed the sources for her materials and impressed me with her bargain hunting ability!  I am sure that I will be checking out garage sales for art supplies once the weather gets warmer.

We started with a typical quilt sandwich and then layered fibers and flowers onto it, finishing with a layer of tulle.  The next step was to quilt it.  In future works I might try using some wool batting because it has the ability showcase quilting well.  I loved adding crystals to the piece with the hot fix crystals and the aid of a pin.  Norma then taught us how to bead so that the beads would be shown off to the best advantage and so that they would be securely attached.

The biggest takeaway from the class for me was her attention both to the craftsmanship and to the artistry of each piece.

Thank you Norma!!


Art with Fabric Blog Hop–Landscape with Birds

I have always loved the artist, Paul Klee, so when Alida invited me to join the Art with Fabric Blog Hop, I jumped at the chance.  Alida asked us to choose ‘a’ work of art to inspire our textile creations.  I couldn’t choose just one!!

Instead, I chose two pieces by Paul Klee:

The first is titled, “Landscape with Yellow Birds,” and the second is “Fire in the Evening Sky.”(Museum of Modern Art, New York).  Of course, one can’t have two without three so I found a poem on Jill Berry Design‘s blog which really spoke to me about hope.

LANDSCAPE WITH YELLOW BIRDS
Shuntaro Tanikawa (1931-    )

there are birds
so there is sky
there is sky
so there are balloons
there are balloons
so children are running
children are running
so there is laughter
there is laughter
so there is sadness
so there is prayer
and ground for kneeling
there is ground
so water is flowing
and there’s today and tomorrow
there is a yellow bird
so with all colors forms and movements
there is the world

Paul Klee’s ‘Fire in the Evening Sky’  inspired me to construct my landscape with horizontal lines.  Our beautiful sunsets over the Mississippi river this summer gave me a color scheme.  My birds are drawn from the ‘Birds in Air” block:

birds-in-air

I inserted triangle birds into my landscape–red, for the cardinals which visit my yard, and a yellow bird to add color and hope.


img_2033

I chose a quilting design which also used horizontal lines and triangles.  In addition, I drew yellow and red birds with big stitch hand quilting.  Finally, I added some random big stitch quilting lines to add spark and interest.

20160930_114357

I used pearl cotton thread and a chenille needle to do my ‘big stitches’.  I also used a thimble–which, in my opinion, is necessary when doing any type of hand quilting.

Please visit the other bloggers up today:

Bea @ beaquilter (http://www.beaquilter.com/)

Heather @ heatherquilts (http://www.heatherquilts.blogspot.com/)

On my longarm today–White on White??

I look all over for inspiration for my own quilting.  I found this amazing piece when visiting the nearby town of Winona, Minnesota. I love the way that the borders and center are different, yet all are related to one another.  Notice the graceful curves and organic shapes.

Who is this amazing quiltmaker??

Perhaps this photo will give you a clue:

20160911_124101_001

Yes, it is the embossed tin ceiling of the Winona Art Center.  Tin ceilings were popular in buildings beginning in 1880s as an economical way to decorate a room’s ‘fifth’ wall.  Many historic buildings still exist with their tin intact. Don’t forget to look up for design inspiration!!

Quilts with Rounded Corners

I sometimes see quilts with rounded corners come across my appraisal table.  The gently curved bound corner is as tricky to sew as a mitered corner.  I tried curved corners on my ‘We Support You’ quilt which you can read about here.IMG_1278020415_1

The curve is easy to accomplish with the aid of a binding cut on the bias.  The bias tape should lay flat with no puckers and the corner shouldn’t pull the corner of the quilt toward the front or back.  I also would recommend curving your corners if you want to use the binding attachment on your sewing machine.

According to Barbara Brackman there are not many quilts made prior to the 20th century with bias binding, yet there are many examples of curved corners.  I wondered if the number of curved corners in the 20th century increased as a result of the use of bias binding, so I went to the Quilt Index to find out.  The Quilt Index has a huge database of many quilts from all time periods.  We can thank the many volunteers who have collected pictures and information through state documentation projects, museums, and collections.  In addition the many organizations who have funded this massive project.  It is a wonderful resource for both information and inspiration; and a great place to browse through on a lazy summer afternoon!

19th century quilts from online auctions with rounded corners.

I started my quest by doing a search on ’rounded corners’.  The results came back with close to 900 quilts!  Since I wanted to compare the trends between 10 year periods of time, I removed those quilts with no dates, no images, and duplicates from the search results.  I also deleted from the search the quilts with shaped edges, i.e. scalloped, jagged, zig-zags, notched; and the quilts which were not shaped like a rectangle or square, i.e. octagons and circles.  Removing those quilts from my search results brought the number of quilts with rounded corners down to approximately 500.  I was very surprised by the small proportion of quilts in the index which have rounded corners. I guess I’m in the minority who think that rounded corners are easier to sew!!!  20160812

Next, I compared the percentage of quilts with rounded corners across the decades to the total number of quilts from those decades.  I expected the percentage of quilts with rounded corners to increase in the 20th century because using bias binding became more common.  I know that I’ve seen more quilts from the 1930’s with rounded corners, but I think that is because I’ve seen more quilts from that period of time.

Capture

In the chart above, notice how the number of quilts entered into the Quilt Index varies a great deal by decade.  You can see the peaks of the 1880/90, 1920/30, and the 1970/80 quilt revivals.  According to the chart above, the percentage of quilts with rounded corners entered into the Quilt Index has not changed over time.  We may think that rounded corners increase in the twentieth century simply because we see more quilts from that period of time.  I did find that there were more scalloped, zig zag, and jagged quilts from the 20th century.

20th century quilts from online auctions with rounded corners.

I’ve run across certain blogs that say that rounded corners in an antique quilt are an indication that the quilt is from the southern United States.  I did a ‘quick and dirty’ look through the Quilt Index and found that there did not appear to be a relationship between rounded corners and region where the quilt was made.  However, the search form does not allow a specific search for ‘location made’ and ’rounded corners’, so I searched through the entire index using ’rounded corners state’.  This method appeared to be working until I got to Michigan…a great number of quilts have ‘Michigan’ in their records because that is where the Quilt Index is housed–University of Michigan.  My curiosity was frustrated!  I would be interested to know if anyone has further insight and evidence into regional differences and rounded corners.

In the meantime, I’m thinking up future searches of the Quilt Index and many more hours looking at beautiful quilts.

Have fun on your quilting adventure!

Lovelli Signature

On the longarm today…Swoon

I feel like I should be putting one hand on my forehead and one on my heart as I sink gracefully onto a fainting couch.  But, no, it isn’t that kind of a swoon, the quilt on my longarm today is made using the pattern, Swoon, by Camille Roskelley.  It is a wonderful pattern which is well written and easy to make.  There are many ways to quilt a Swoon quilt top and for, me, that is one of the challenges–because I want to try them all!!  For this quilt, I chose a block pattern from One Song Needle Arts which would lay nicely in the block, emphasizing the different segments of the block, and yet be a cohesive design.  I always try to add ways which cause a viewer to look at a quilt and find interest from across the room, from closer, and then from closer still.  One way to do that is to lay a quilting design on top of the quilt so that it doesn’t follow the piecing exactly, but it emphasizes it.

As I design a quilt layout, I look for designs which repeat motifs found in the fabric, in the piecing and/or in the applique.  For the Swoon quilt I noticed that several fabrics had circles, and that several had flowers.  I chose to combine several different flowers by Anita Shackelford for the sashing.

I was very pleased with the way that the quilting turned out.

Now is a great time to get started on Christmas gift piecing.  I can guarantee that any quilt sent to me for quilting in August will be quilted before Christmas (custom or edge to edge).

Have a great quilting adventure!!

lovelliquilts.wordpress.com

On my longarm today…Scaling quilting designs

IMG_1911

I love quilting baby quilts and this sweet pattern with small Churn Dash blocks is no exception.  I wanted the quilting to reflect the vintage pattern and the retro feel of the fabric.  The blocks were 6 inches square, which is about half the size of a standard block (12″).  It would look funny if a quilting pattern designed for a 12″ block was used on a 6′ block.  In my software, Creative Studios 6, I was able to preview the quilting design.

Capture 1


In the first example, the Butterfly and Flower design by Kim Diamond, is shown on the quilt top as if it were stitched out with the default size of 12″, notice how large the flowers of the quilting design are compared to the size of the block, and the individual pieces which make up the block.  In addition, the size of the flowers in the quilting design are approximately 10 times larger compared to the size of the flowers in the fabric.

Capture 2

In the second example, the quilting is denser, but it is also more in scale with the block size and the scale of the prints.  I much prefer being able to preview how my quilting is going to look on my computer monitor and then hitting ‘undo’ than to quilt something out which I don’t like and taking my seam ripper out to undo it!

The finished quilt had a soft, ‘quilty’ look and feel–just perfect to wrap a baby!!

Have a quilty day!!

Lovelli Signature


On the Longarm today–a cup of Kaffe Fassett coffee

It is so much fun to quilt a quilt with beautiful color and fabric.  This lovely design is by Virginia Robertson Designs and it uses Kaffe Fassett fabrics with a purple Grunge background.  The challenge for me as a quilter was to make the applique stand out and to let the fabric be the star.

`IMG_1879

I used double 80/20 Cotton/Polyester batting because I wanted the applique to pop out of the surface of the quilt.  I stitched in the ditch around the cups, handles and saucers.  I wish I had a magic wand which makes ‘ditching’ easier.  However, the real trick to getting the needle and stitches to go in the tight indentation between applique and background  is concentration and patience.  The next thing is to choose the right thread color.  Before starting to quilt I auditioned several thread colors:IMG_1867There are 4 different threads here–the first two are Superior So Fine, the next is Isacord and the last one is Aurifil.  I didn’t like the first and last because the purple was too red and they were really dark, I thought that they would fight with the maker’s fabric choices. The second one was too light and obvious on all the fabrics, although, if the quilt was going to be about the quilting it would have been a good choice.  The Isacord won–I had some trepidation about using it because I had never used on my longarm, but it worked beautifully and I had zero tension issues.

My next challenge was to find a quilting design which would make the background recede and would give it texture in a relevant way.  I found a coffee bean design by Mike Fountain at Intelligent Quilting.  I think it works really well as a background ‘meander’.

IMG_1875IMG_1874

I would love to have one of those cups filled with coffee every morning!!

Lovelli Signature


Modern T-shirt Quilt

Hello,  do you remember me?  I know I’ve been gone for awhile, but I am back now.  I plan on getting caught up with lots of ideas and enthusiasm for quilts and sewing!  My camera is full of the projects which I plan on blogging about and I just need to sit down and write.  School will be starting soon here in the United States and the weather will be getting colder.  My youngest will be starting his senior year in high school (where did all the time go?).  It is time to plan his ‘graduation’ t-shirt quilt.  I have been faithfully collecting the out-grown t-shirts in a box under my longarm.  Over the next few months I will walk you thru my T-shirt quilt creation process.

Step one:  Collect T-shirts.  When my niece was a senior, several years ago, I offered to make a quilt for her.  Her mom and grandmother gave me a series of t-shirts from her high school theater productions (they brought over a stack of neatly laundered and ironed t-shirts!).  Collecting t-shirts around a theme helps to make the quilt more cohesive.  Themes can be narrow, e.g. marathons, baseball, theater, band, scouts, etc., or they can be broad, e.g. school activities, family vacations, etc.  Sometimes I just collect them around a color, or I just empty the collecting bin.

IMG_0631Jessica Quilt

Step two:  Cut, fuse, and trim the t-shirts.  First, I cut the front of the t-shirt away from the back and roughly trim it so that there is at least an inch or two away from the design.  At this point I can tell if all of the t-shirts will trim down to the same size (rare) or multiple sizes (the norm).  Then I fuse the t-shirts onto French fuse (tricot fusible) or a light weight fusible interfacing.  If I use the tricot fusible I make sure that stretchiest direction of the fusible is fused to the least stretchy direction of the t-shirt. Thus, making the t-shirt less stretchy in all directions.  Lastly, I trim the t-shirts to their finished size plus 1/2 in (seam allowance).

Step three:  Edit.  I decide which t-shirts will appear on the front of the quilt, and if I have too many, which will appear on the back of the quilt.  At this point, I interview the recipient–which t-shirts are the most important? what designs do they like:  traditional, modern, regular, irregular; what colors do they like? etc.  I like to place their name on the front of the quilt in some way, either with a t-shirt, appliqued or embroidered.

IMG_0630Jessica Quilt

Step four:  Design.  My niece wanted a ‘modern’ quilt with grays/blacks as the background.  I used google to search ‘modern design’ and found images of modern designs.  I thought that this type of design would be perfect for my niece.  I designed each block in EQ7 and then arranged them in a quilt.  I made sure that the quilt was going to be the right size for her college dormitory (extra long twin)

T shirt for Jessica

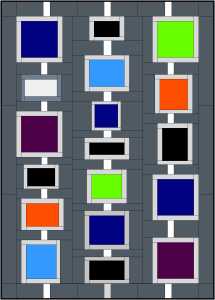
Step five:  Piece the quilt top and the back.  Using my EQ7 design, I cut background fabric and pieced together the blocks of the quilt.  The back of the quilt is a good place to put leftover blocks and fabric.

IMG_0624Jessica Quilt

Step six:  Quilt as desired.  I always keep in mind that these quilts are loved and laundered frequently.  I like to quilt them at least every inch and use good thread so that they will stand up to all of the love–these are probably not the quilts to use heirloom custom quilting on.  My oldest son’s t-shirt quilt, which was tied, not quilted made it through 4 years of college…barely.

Step seven:  Bind.  Make sure that your binding is sturdy and sewn on well because it is the part of the quilt which gets the most use.

Step eight:  Label.  Unfortunately, my photo does not show my writing on the label, but it is there–my name, the date made, place made and why I made the quilt.

IMG_0626Jessica Quilt

Step nine:  Give it to the happy recipient.

IMG_0623Jessica Quilt

I look forward to working on my son’s t-shirt quilt with you.  Do you have a bin of t-shirts ready for a quilt?

Lovelli Signature

Elli’s Adventures in the Blogiverse

It has been a year since I started this blog, whew!  I’ve learned a lot in the past year about blogging.  I thought that the years of lurking and reading blogs would prepare me to *write* a blog.  I’ve had highs and lows.  If you are thinking about starting a blog, I hope my many ‘adventures’ (in our house we call every wrong turn or mistake an adventure) will help you…or at least give you a chuckle.

20141121

I knew about those horrid ‘no-reply’ bloggers, had read the posts about the subject.  And then (cue horror movie music)…I started commenting on other blogs, referring back to my blog….I got messages, all kind, stating that I was a ‘no-reply’ blogger (cue ‘Psycho’ shower scene music).   Oh no!  I felt like I was in a nightmare, you know the one where you show up for your final exam/first job/first quilt lecture wearing your clothes inside out and backwards.   aargh!  Luckily, I was able to fix the problem thanks to this post, from Simple Moments Stick.  OK, now my nightmares are about normal things like quilting an entire quilt with the wrong side of the backing facing out, or having to walk barefoot through a pin strewn floor, or publishing a post without hitting the publish button, or taking pictures with no memory card, or…

20141019

I was starting to blog semi-regularly and then the winter hit…(cue music from Rudolf the Red-Nosed Reindeer)…the fifth coldest in Wisconsin’s history…We soldiered on despite my only window being blocked by snow.  I tried to blog ahead only to realize that I wrote about things that were to happen in the future after they had already happened…confused?  so am I!!  I started writing tutorials only to photograph the steps with no memory card in the camera…Eventually you’ll see the tutorials, but I have to make up the samples again.

20141009

One day in those early months, I posted my blog, then saw a spelling mistake, then fixed the mistake, I thought I hit ‘publish’, but evidently I didn’t.  Unfortunately, WordPress sent the original post out to Facebook and Twitter and to my e-mail followers and the links didn’t work.  I’m now following my own blog–it feels weird, like voting for myself.  Hopefully I’ll find the mistakes before my wonderful readers do, but I’m human  (please don’t tell my sons).  In the meantime, I’ll vacuum the sewing room floor, put the memory back into the camera, double check the backings and press on.

20140818a

Thank you, dear readers for being patient.

I have many plans for the months ahead including more Quilt Design a Day, blog hops–the next one is Tree Bird, more quilts, more bags, and more tutorials:  kitchen accessories, foundation piecing….

Have a quilty day!

Lovelli Signature


Please note:  If you would like to use my designs please leave a comment below or e-mail me (lovelliquilts(at)gmail(dot)com).  I’m happy to answer questions you might have regarding size, pattern availability, etc. or even to have you test a pattern.  Please credit me if you use my designs by stating “Designed by Elli Molstad at LovelliQuilts.me”.